Saturday, January 23, 2016

Messenger Bags


On the way home from my Mom & Dad's house we stopped by the American Girl Store in Lynwood to check out the girl of the year Lea Clark.  We spotted her new messenger bag which was super cute, but it came with a $38 price tag and times two that was too much to spend.  A cool feature about this bag is that it can be converted from a messenger bag to a backpack, by moving around the strap.


I thought maybe I could make bags instead.  So I started looking up patterns on Pinterest and found a cute one that looked pretty simple. The best part is that I only needed two yards of fabric and about one yard of fusible fleece. 
Messenger bag pattern and tutorial
http://crazylittleprojects.com/2012/09/messenger-bag-tutorial.html

I let each girl pick out their own fabric.

Abbie's fabric choices
Madison's fabric choices


To make the most of each yard of fabric here is how I cut my fabric.  You need the side of the bag and the straps to be 45 inches long.  Because the fabric is not 45 inches long take note at my solution.  It is not visible in the finished bag. 

The directions are straight forward and easy to follow.  I am just including my additions.
First I made my straps a bit more narrow three inches instead of four inches.
Sides of the bag and straps, you can barely tell that I added an additional piece to make the correct length.  Plus I saved some $ by only purchasing one yard of fabric. 

Second my girls requested lots of pockets, so of course I added a bunch of pockets. 
Outside of the bag with additional pockets

Inside of the bag with additional pocket

Inside pocket:
(2) 6.5 x 17 inch strips of fabric

Outside back pocket:
(2) 9.5 x 17 inch strips of fabric

Front pocket:
(2) 10.5 x 10 inch strips of fabric


To make each pocket I put right sides together sewing around the perimeter with a 1/4 inch seam allowance and leaving a two inch space so I could turn the pockets.  I then flipped the pockets right-side out and ironed them flat.  I thought the outside front and back pockets needed more stability so I added a piece of fusible fleece before I sewed them together.  I didn't do this to the inside pocket because of the pencil slots.


The girls wanted pencil holders on the inside so I sewed every one inch until I had nine spaces for pencils.
 
Close up of inside pocket
Inside pocket with pencils


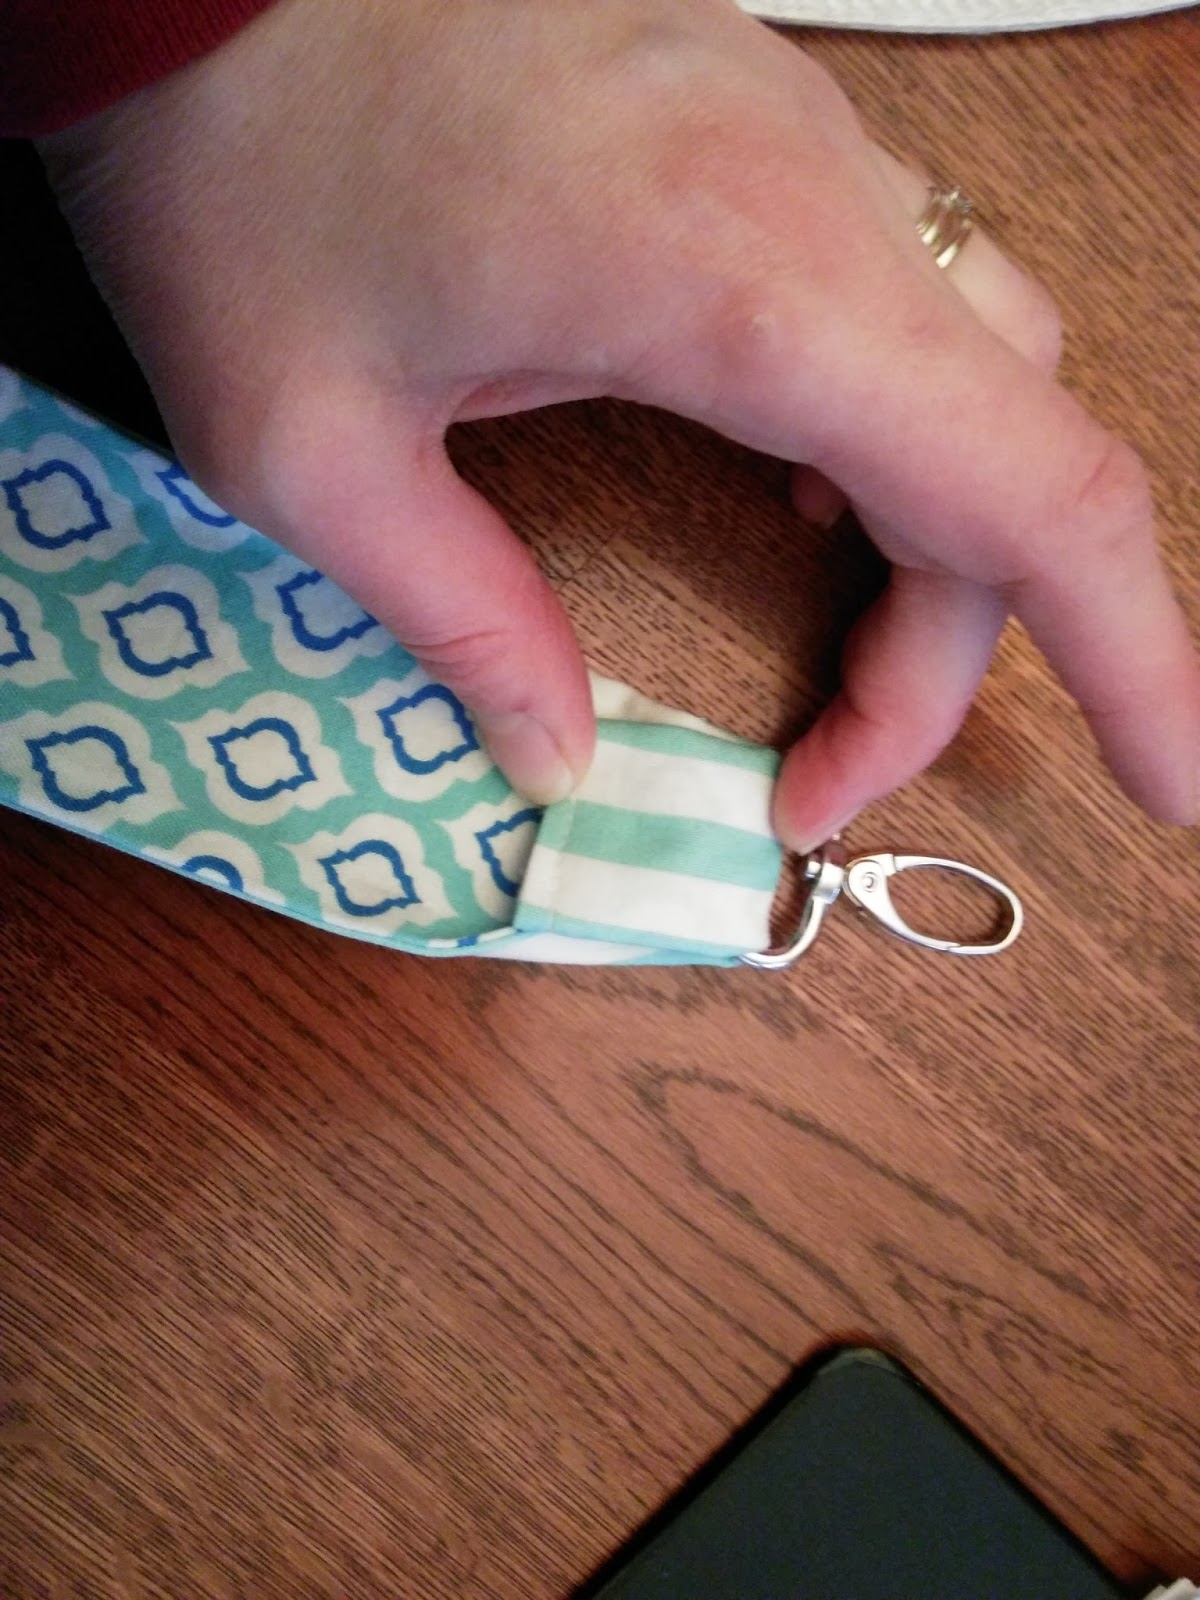
Third I decided to make the straps a little more like Lea Clark's messenger bag.  I purchased 1-inch non welded nickel plated D-rings and 1-inch silver curved lobster swivel clasps on Amazon.com.
You will need two lobster clasps and four D-rings so the bag can be converted from a messenger bag to a backpack. 
Insert the lobster clasp on each end of the strap fold down as shown and sew.


To attach the D-rings use premade extra wide (3/4 inch wide) bias tape (I created my own) four inches long for each D-ring.  Attach two along the sides of the bag and two at the base of the bag.

 
For the back hangar, I made a wider bias tape (1 inch wide) seven inches long, with fusible fleece inside.  It should be attached in the center of the back of the bag just below where the bag flap starts. 

Messenger Bag
Backpack
 
I am really happy with the result.  I think it is pretty comparable to Lea Clark's messenger bag and they are completely customized based on my daughters color preferences. 


Friday, January 22, 2016

Quilt preparation continued

One of my resolutions for 2016 was to sew more.  Now that I made two messenger bags for my daughters, it is on to my quilt.  In October I got all the squares cut out.  I decided to be done for a bit because I knew the fall would be busy.  The next step was to split the squares into 16 groups and get the squares marked and ready for sewing.


Looking at the finished product I split up my squares into the appropriate 16 sections and thought I was ready to start sewing. 
 

Not so fast, I needed to make pencil lines on some of my squares so the triangles would be evenly sewed.  So I watched TV and made a whole bunch of lines.  Luckily I had a lot of TV to catch up on.


Sunday, January 3, 2016

New Year New Ideas

Well, 2016 has started I have been pondering a lot of things.  I have never taken New Year's Resolutions seriously, but I am 39 and there are a few thing that I really want to do this year....


1.  I want to sew more, I have a fantastic sewing machine that has not gotten enough attention lately. My Mom bought me a queen size quilt kit for my birthday in September and I have all the squares cut out but I need to start construction. I want to have this quilt completed by June.  
I do have a good start.  All the prep is done I just need to start sewing!


2.  My sister and I want to get our business started.  We have been talking about it for a few years now.  We are both creative and would like to find a way to make extra money by selling jewelry, and other things we make at local Farmer's Markets or online.  We have the name and lots of ideas but they have never materialized.  

3.  I want to maintain a blog.  It sounds fun and I can get my ideas down somewhere.  Plus I do a lot and seeing it would make me feel more accomplished in my daily life.  I also think I would be more accountable if I actually wrote it down.  
                   Life as a Mom in Washington


4.  I would like to achieve and maintain a healthy weight with a good exercise plan that does not involve spending all my time exercising and dieting.  I don't want to use diet foods, I don't want to starve myself, I want to enjoy what I eat, and I want to have fun when I exercise.  I would love to create a running/biking group of my friends that meet once or twice a week so we actually do it.  
                                     
5.  I want to read more books.  The girls and I read books together, but I have fallen into a book hole since I finished The Harry Potter series.  I am so picky about books, I always have been. I know that there is another author out there I will fall in love with.  
                                                         

Quilt selection and preparation

Quilt Project Part One

My Mom asked me what I wanted for my birthday this year.  I spend so much time on Madison & Abbie's birthday, by the time I get to my birthday I am tired.  I had no idea what I wanted so she sent me a link to a quilting catalog and it peaked my interest. There were a ton of beautiful quilts to look at but this one caught my eye.


I thought this would make a really beautiful spring/summer quilt in our bedroom.  So I asked my Mom and she ordered it.   When it arrived this is how the fabric came..... a whole bunch of fat quarters ready to wash, iron, and cut out.  The vibrant colors made me giddy, I love this color palate. The aqua with the red and sage is gorgeous!   Back fabric was not included so my Mom and I headed to Joann Fabrics and found a complimentary fabric.  


I know this is going to be a challenge because the school year is so busy.  Before the year got too busy with Nutcracker practice, Girl Scouts, AWANA, and dance classes I knew I needed to get the squares cut out.  October 30th 2015, I was done with all the preparations.  912 squares cut out and ready to sew!  
912..... really?????  What have I gotten myself into?  Too late now I am committed!  


Great Start to 2016

POLAR BEAR PLUNGE 2016

I did a Polar Bear Plunge in 2012 and it was a blast.  I have wanted to do one ever since, but for some reason or another I haven't.  So this year I decided to stay an extra day on Orcas Island and do the Polar Bear Plunge at Cascade Lake.  I convinced my daughters to do it with me this year. My youngest, Madison, is very adventurous and said 'Sure, that sounds fun!' My oldest, Abbie, is a bit more cautious and asked a bunch of questions.  I was a lot like her when I was little so I simply told her "Sometimes you just need to do stuff, just to do stuff and not worry about so many details." So we were in agreement, all three of us would do the Polar Bear Plunge.
The plunge started at 11am on January 1st.  Of course that morning like usual I got side tracked and we ended up getting there five minutes late.  Instead of being sad I seized the opportunity since we were there and willing.  I got the chair out for my Mom and plopped her on the beach.  Then I said we are doing our own Vaskelis Polar Bear Plunge!  "Mom get the camera ready we are doing it."  I grabbed the girls hands, we counted to three, and we ran in.  Madison was the first out followed by Abbie and I a few seconds later.  Abbie freaked out a little bit because she was so cold.  I told her that was normal.  We got wrapped up in towels and congratulated ourselves for a job well done.  I asked Abbie if it was that bad.  'Mom, it is really refreshing, I just can't feel my toes and I don't like that.'  I asked Madison what she thought.  'Mom that was awesome, I can't believe I just did that!  I am really cold though.'  Grandma purchased shirts for them, we put on jackets, and headed to Rosario so we could warm up in the pool and hot tub.  I hope that this becomes a yearly tradition because it truly is a blast!!

Ready to go

The countdown

We are off

That was fast

Warming up

Picture with Grandma

Celebratory Shirts

Warming up in the hot tub

Sunday, August 30, 2015

Stampin' Up Stamp Pad storage


                                       Stampin' Up Stamp Pad storage
   

1. Take an ordinary Costco Greek
Yogurt box
2. Open all ends
 

3. Measure out 2 3/4 inches

4. Mark 2 3/4 inch line on both long
 sides of the box


5. Cut one side

6. Cut other side so you have
two separate pieces


7. Using a hot glue gun re-glue both
sides back together 

8. Box one is done


9. Repeat for second box

10. Insert stamp pads

11. Nice fit, you can even sneak a
few extra on the side

12. Place in the drawer for storage, and
they can be easily removed for use